The setting of certain attributes for the .scenario tag using Guerilla:
Go to the main Halo directory. In the root directory is where all the Halo tools exist, there should be a program file called guerilla.exe.
1) Run Guerilla and open the tutorial.scenario tag.
A window displaying all the tag information for the tutorial.scenario tag should now appear.
2) Since the tutorial level is an outdoor level, a sky model must be referenced in order for a sky to render properly in the game. In addition, the .sky tag contains information that will be used by radiosity to light the level. To reference a sky model follow the procedures below:
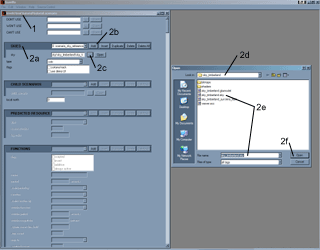
a) At the top of the tag information there is a section called "Skies".
b) Click the Add button. A sky reference has now been added but the specific reference must be defined.
c) In the sky field reference a file by clicking on the "..." button. A file Open dialog window will appear.
d) The majority of skies that can be used are found under the main tags directory under the "sky" subdirectory.
Go to this directory. There should be several subdirectories, several .skies have been included in the Halo Editing Kit.
For the tutorial level, the sky_timberland.sky will be used. Enter the sky_timberland subdirectory.
e) Select the data tag sky_timberland.sky.
f) Hit Open.
The tag sky\sky_timberland\sky_timberland should now appear in the "sky" field.
To view the sky_timberland.sky tag and its associated values click on the Open button located to the right of the "sky" field.
If the level requires different settings than what exist in the .sky tag do NOT modify the existing .sky tag if it is used by other levels or those levels will be affected as well. The proper procedure is to create a new custom .sky tag.
The first image further explains the above procedures and shows the final results of the above actions.
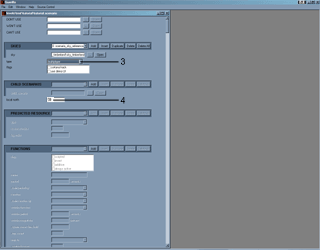
3) The level must be defined as a multiplayer level. To set the level up as a multiplayer level go to the "type" pulldown menu under the Skies section and select "multiplayer".
Setting the level as multiplayer is important since this tells Tool and the game what resources should be included during the .map cache file creation process.
4) Next, the relative North for the level will be set. This setting affects the direction that the compass on the Assault Rifle points to.
Under the section Child Scenarios, enter the angle value 90 in the "local north" field. The tutorial level is rotated 90 degrees, thus putting the intended North end of the level at this same angle.
The second image further explains the above procedures and shows the final results of the above actions.
5) The default weapons and equipment for the player will now be defined. The default or starting weapons can be defined specifically for this level for each different game type.
a) Find the section "Starting Equipment". This section is located about halfway down the tag data.
b) Three different profiles will be added. Click on the Add button 3 times.
c) Using the pull down menu select the "0. scenario_starting_equipment" settings.
Set the following settings for Capture the Flag (CTF).
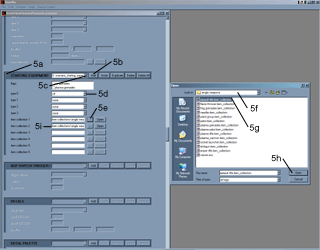
d) For the "type 0" field use the pull down to select "ctf". This setting tells the game that when CTF game variants are run to use the item collections defined below.
For CTF, the default weapons will be the Pistol, Assault Rifle and Frag grenades. The player will spawn with these weapons every time the game first starts or when they are eliminated and respawn.
e) In the "item collection 1" field hit the "..." button. An Open file window will now appear.
f) Go to the "item collections" tag directory and then choose the "single weapons" tags subdirectory.
g) Select the "assault rifle.item_collection" tag file.
h) Click on Open.
i) In the "item collection 2" field follow the same procedures but select and add the "pistol.item_collection".
The player WILL spawn with standard Frag grenades in this game mode, so the grenade check boxes will not be touched (these are located under the "flags" section at the top of the "Starting Equipment" section).
Item collections (.item_collection data tags) contain single weapons and items or combinations of weapons and items that can be referenced in order to place weapons and items (such as powerups) in a level.
The third image further explains the above procedures and shows the final results of the above actions.
6) The next settings for default weapons will be made for ALL game types or game variants except those for CTF and Race modes.
Games that run these game modes will have the player spawn with just the Pistol and Frag grenades.
a) Using the pull down menu select the "1. scenario_starting_equipment" settings.
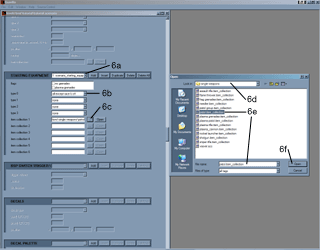
b) For the "type 0" field use the pull down menu to select "all except race & ctf". This setting tells the game to use the item collection settings below for all game types other than CTF and Race modes. The Slayer, Oddball and King of the Hill modes will use the item collection settings defined below.
c) In the "item collection 1" field hit the "..." button. An Open file window will now appear.
d) Go to the "item collections" tag directory and then choose the "single weapons" tags subdirectory.
e) Select the "pistol.item_collection" file.
f) Click on Open.
The player WILL spawn with standard Frag grenades in these game modes, so the grenade check boxes will not be touched (these are located under the "flags" section at the top of the "Starting Equipment" section).
The fourth image further explains the above procedures and shows the final results of the above actions.
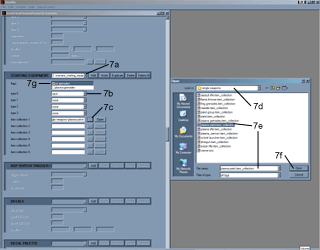
7) The next settings for default weapons will be made for game types that are based on Race mode.
Games that run the Race game modes will have the player spawn with just the Plasma Pistol and NO grenades of any type.
a) Using the pull down menu select the "2. scenario_starting_equipment" settings.
b) For the "type 0" field use the pull down to select "race". This setting tells the game to use the item collection settings below for all game types that use Race mode.
c) In the "item collection 1" field hit the "..." button. An Open file window will now appear.
d) Go to the "item collections" tag directory and then choose the "single weapons" tags directory.
e) Select the "plasma pistol.item_collection" file.
f) Click on Open.
g) The player will spawn with NO grenades in this game mode.
Under the "flags" section at the top of the "Starting Equipment" section check the "no grenades" option box.
Once the above procedures have been completed, save the tutorial.scenario tag. This can be done by going to File -> Save.
The fifth image or last image further explains the above procedures and shows the final results of the above actions.
As objects are added in Sapien, additional data will be added to the .scenario tag. This data can be viewed using Guerilla. Using Guerilla in this manner can help track down errors or view resources used in the level. |

Click to Open Larger Image in New Window

Click to Open Larger Image in New Window

Click to Open Larger Image in New Window

Click to Open Larger Image in New Window

Click to Open Larger Image in New Window |