Level Compilation


The following section provides information and a tutorial on compiling an exported .jms file into a data tag format that can be manipulated by the Halo tools and eventually packaged to run in a Halo multiplayer game.


Using Tool.exe to Compile the Level


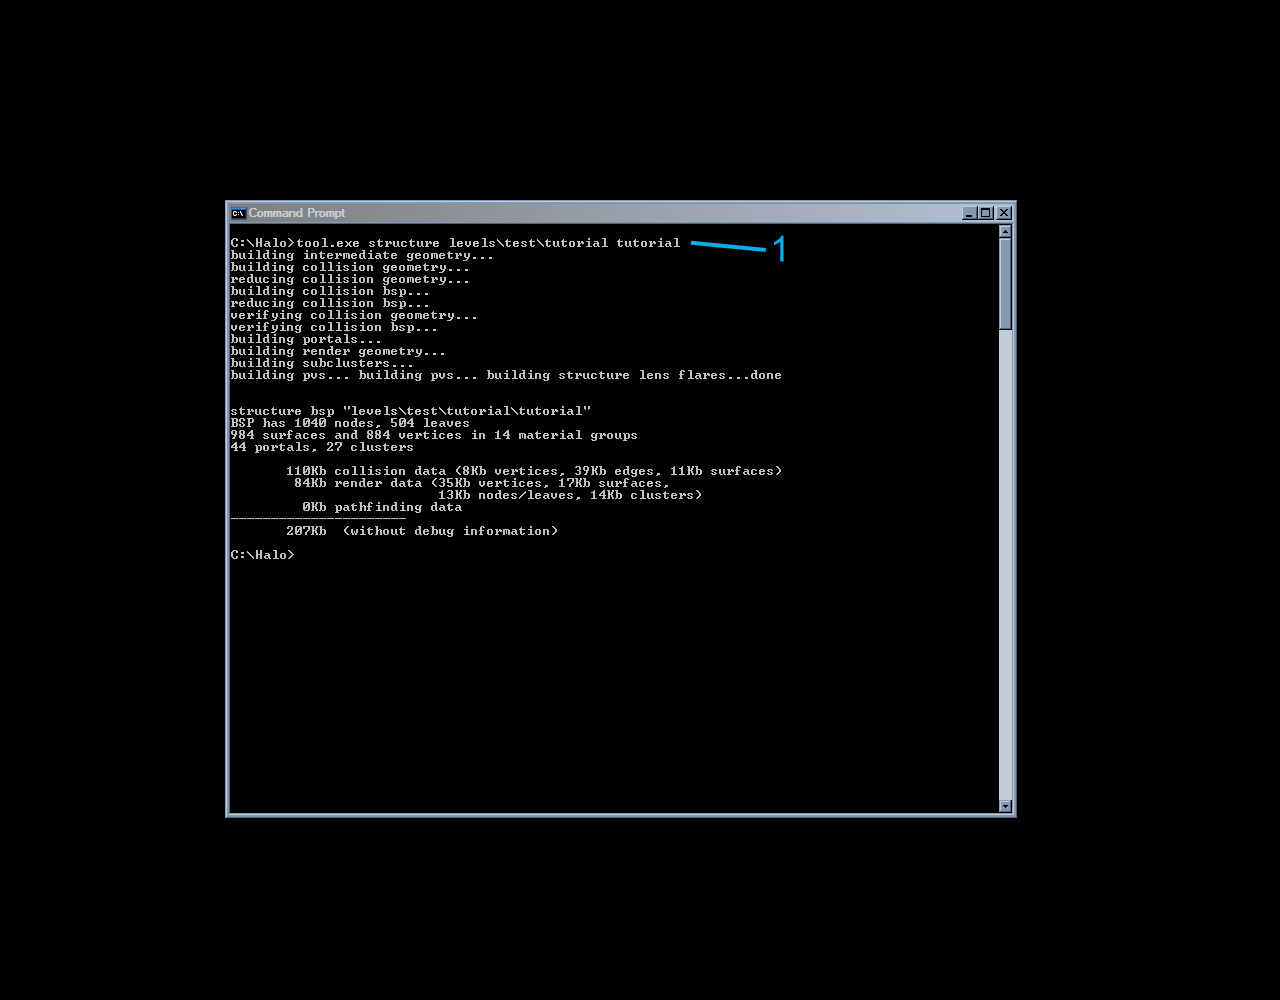
The following procedures and example images demonstrate the "compiling" or processing and converting of the tutorial.jms into the .scenario and .scenario_structure_bsp data tags using Tool.

It is these data tags will be manipulated to create a working multiplayer level that will then be compiled into a .map cache file and run in Halo.


Compiling the level using Tool: In Windows, open a Command Prompt. The Command Prompt can be found by going to Start -> Accessories -> Programs -> Command Prompt

In the Command Prompt go to the main Halo directory.  In the root directory is where all the Halo tools exist, there should be a program file called tool.exe.

Typing just tool.exe at the Command Prompt and hitting Enter will show all the available command line parameters as well as the usage and syntax options.

The command line that will be used in the following example is "structure" and it has the following syntax:

structure scenario-directory bsp-name

The syntax parts are described below:

scenario-directory - This is the name of the directory where the level directory structure is located.  The directory structure that was set up for Halo editing is very specific, because of this Tool automatically looks in the "models" directory for the .jms file.  The full directory structure name is also not needed because of this.

bsp-name - This is the name that will be used when the .scenario and .scenario_structure_bsp data tags are created. The file extension names are NOT necessary.

1) At the Command Prompt type the following and hit Enter:

tool.exe structure levels\test\tutorial tutorial

The level should have compiled successfully.

The first image further explains the above procedures and shows the output of Tool.exe in the command window.

As a result of the compilation process, not only were the tutorial.scenario and tutorial.scenario_structure_bsp tags created, but the entire directory structure for the level should now exist (if it did not before) under the tags directory (i.e. Halo\tags\levels\test\tutorial).

Subsequent compiling of the .jms file will only update the .scenario_structure_bsp and not the .scenario data tags.


Click to Open Larger Image in New Window


Troubleshooting the Compilation Process


Error Geometry .wrl File

During the compilation process, tool may display warning messages or error messages to indicate to the user that the level contains problems that may cause the level to not work properly in the game. Some errors are severe enough that the level will not compile successfully, while other minor errors may still allow the successful compilation of the level but the end user should still investigate the problem.

To help track down errors and investigate problems in the level geometry, Tool will export an Error Geometry File that takes the form of a .wrl file (this is actually a VRML format).  The .wrl file is incredibly useful since it can be imported into 3ds Max and can provide a visual representation of the error as well as many other useful visual indicators such as outlining or bordering the geometry or region that has an error.

When the .wrl file is created, it will exist in the main Halo directory, which is also the location of tool.exe.  The name of the file will be the same as the name of the level but with the .wrl file extension.  For example, an error during the compilation of the above tutorial.jms would create a tutorial.wrl file.

To import the file into 3ds Max do the following:

1) Click on File and select Import.  The Select File to Import window will appear.

2) Use the Files of type: pull down menu to help filter files by type, in this case select VRML (*.WRL,*.WRZ).

3) Select the Halo root or main directory.

4) Select the .wrl file for the level and click Open.  The VRML Import window will appear.

5) Uncheck all the check boxes under the Input Options (Reset Scene, Turn to 3DS Coordinates and Create Primatives).

6) Click on Ok

The error geometry should now be in the level as separate objects.  These objects can be selected as normal or can be viewed and selected by clicking on the Select by Name button to bring up a list of all the objects in the level.  Note that none of the Error Geometry objects that are imported are attached to the frame.


Common Errors and Solutions

The following table outlines some common errors and warnings that may occur when compiling the .jms for the level and provides suggestions or solutions that should help in the successful compilation of the level using Tool.  Note that the following list is not a comprehensive listing of all warning and error output messages from Tool in relation to the .jms compilation for a level.

The error geometry .wrl file should be used in conjunction with the warning and error output messages provided by Tool.  The warning and error messages will often contain a color code for the error geometry.  When the .wrl file is imported into 3ds Max, it is this color coded error geometry that should be looked for in reference to the specific error message.


Warning or Error Message Suggestions or Solution
 
When compiling using Tool the following message with options appears:

choose a type for the shader <SHADER\MATERIAL NAME>:
1. shader_environment
2. shader_model
3. shader_transparent_generic
4. shader_transparent_chicago
5. shader_transparent_chicago_extended
6. shader_transparent_water
7. shader_transparent_glass
8. shader_transparent_meter
9. shader_transparent_plasma
choice (1-9):
The material name or shader name is either incorrect (wrong name, too many characters in the material name, etc...) or the shader or material does not exist.

To correct this problem and continue the compilation process, select one of the options from the list to automatically create the shader tag which can then be edited or replaced later.

The other option is to break out of the compilation process (CTRL-Break) and create the shader and then run the compile process again.
When compiling using Tool the following warning message appears:

### WARNING found nearly coplanar surfaces (red and green)
As the message indicates, there are faces or triangles that are coplanar.

This error is commonly caused by the creation of a surface (such as a wall) at an angle.  This surface tends to have many surfaces or triangles in its construction that are side by side.

Make the surfaces planar or adjust the faces (move vertices) such that there is more variation in the surface (the surface is no longer flat or planar or nearly flat or planar ).
When compiling using Tool the following warning message appears:

### WARNING: found duplicate triangle building connected geometry. YOU SHOULD FIX THIS. (see orange in error geometry)
There are duplicate triangles in the geometry.  These are triangles that exist in the exact same space as another triangle (the vertices and edges of the triangle are identical to those of another triangle).

Remove the duplicate triangles.
When compiling using Tool the following warning message appears:

### WARNING found # degenerate triangles.
There is an error in the construction of the triangles that compose the level geometry.

Check for triangles that have had edges turned or have been modified such that 2 edges of the triangle now exist in the same space (share the same vertex coordinates).

These will often appear in 3ds Max as a single edge when in fact it is just the collapsed or malformed edges of a triangle all occupying the same space.
When compiling using Tool the following warning message appears:

### WARNING unearthed edge (magenta boxed lines)
This is a problem caused by the implementation of the portal planes and geometry.

As the warning message implies, the edges of a portal plane do not form a sealed volume that can be used to define a portal.

Make sure that the edges of portal planes completely extend into the level geometry in order to form a "seal".
When compiling using Tool the following warning message appears:

### WARNING: a surface clipped to no leaves (see cyan in error geometry)
This is a problem caused by the implementation of the portal planes and geometry.

This can be caused by geometry that has a face which is coplanar with the faces of another piece of geometry.

A good example would be a cube that has a face resting on the faces of another surface (such as a floor).  In this case, an error may not have occurred before, but once portals are added or defined the portal calculations during the compilation process detects the error since it cannot properly create a portal between the two pieces of geometry.

In the above example, there are two solutions.  The cube can be moved such that it no longer has its bottom faces resting on the faces of the other surface.  The other solution is that the cube should have its bottom faces removed and the remaining faces should be properly integrated with the surrounding faces. 
 
When compiling using Tool the following error message appears:

### ERROR collision bsp is empty.
This error can occur when a .jms file is exported that contains valid geometry that has no collision and is attached to the frame. 

Such geometry includes geometry with only faces that have a material assigned to them with the "!" Render Only Shader Symbol.

The .jms file exports successfully because there is valid geometry attached to the frame, however Tool cannot build the necessary collision bsp without any geometry that has actual collision.

Make sure that geometry with collision is attached to the frame.
When compiling using Tool the following error message appears:

### ERROR found z buffered triangles (red).
This problem is typically caused by the overlapping or interpenetration of geometry or faces.

If not fixed, this error can lead to rendering or visual errors and anomalies for the offending faces.
When compiling using Tool the following error message appears:

### ERROR edge # is open (red).
There is an open edge in the level.

Typically, there is a "hole" in the level that is preventing the level from satisfying the Sealed World Rules and therefore the level cannot compile successfully.
When compiling using Tool the following error message appears:

### ERROR couldn't update edge # (red).

This is typically caused by faces or surfaces that are duplicated or shared between objects.

The faces have shared vertices and\or faces.  The objects should either be separated or merged.

A good example would be 2 identical cubes that have been moved together such that they each share one side.  The cubes should either be moved apart, or merged together which would include the removal of any duplicate or illegal faces.
When compiling using Tool the following error message appears:

### ERROR couldn't build bsp because of overlapping surfaces (orange)
This is typically caused by intersecting or interpenetrating objects or object volumes.

A good example would be where there are 2 cubes and one of the cubes has been placed intersecting the other.
When compiling using Tool the following error message appears:

### ERROR: portal does not define two closed spaces. (see yellow in error geometry)
This is a problem caused by the implementation of the portal planes and geometry.

Typically, this error is caused by a standard Portal or Portal volume intersecting an Exact Portal plane or volume.
When compiling using Tool the following error message appears:

### ERROR couldn't build bsp2d.
This error is typically the result of other errors, resulting in the failure to create the bsp structure.

See the above errors.  The resolution of the errors above will most likely correct this problem and result in the successful compilation of the .scenario_structure_bsp.
When compiling using Tool the following error message appears:

### ERROR couldn't build leaf.
This error is typically the result of other errors and causes an error in the creation of the bsp structure.

See the above errors.  The resolution of the errors above will most likely correct this problem and result in the successful compilation of the .scenario_structure_bsp.
When compiling using Tool the following error message appears:

### ERROR failed to build collision geometry.
This error is typically the result of other errors, resulting in the failure to build the collision geometry or hull.

See the above errors.  The resolution of the errors above will most likely correct this problem and result in the successful compilation of the .scenario_structure_bsp.
When compiling using Tool the following error message appears:

### ERROR failed to import collision bsp.
This error is typically the result of other errors, resulting in the failure to create the collision geometry or hull.

See the above errors.  The resolution of the errors above will most likely correct this problem and result in the successful compilation of the .scenario_structure_bsp.


Conclusion to Level Compilation


The level geometry has now been successfully exported and is ready to be compiled in preparation for it to go through the processes that will get it running in Halo.

Completed versions or example versions of the level tags that are created in the tutorial sections can be found under the "Halo\tags\levels\test\tutorial_examples" directory.  The compiled tags have been provided as a reference to aid in the learning process.

Once the user has successfully completed the export process they can proceed to the next section Level Data Manipulation in Guerilla.